There used to be a time when running your own business meant years of hard work. You’d have to build new skills, learn how to source products, price them, connect with customers, manage logistics, even design an impressive online presence. Now, things have changed.
Sure, running any kind of company still takes work, but it’s a lot easier to get started than it once was. We’ve got ecommerce platforms that allow anyone to spin up a high-quality online store in minutes.
Then there are POD partners that remove the need to actually design, create, and even ship products to your customers. The biggest challenge is usually figuring out which systems to use, and how to connect them. That’s what this guide is for.
I’m going to show you step-by-step how to take advantage of one of my all-time favorite power-couple for POD selling: Shopify and Gelato. It’s probably a lot easier than you think.
Fast-Track: 60 Second Summary
- The POD market is growing at a rate of 25.8%, and Gelato is one of the best partners out there, particularly if you’re looking for product quality, sustainability, and quick fulfillment.
- Shopify is easily one of the most popular ecommerce platforms available, giving you everything you need to manage, build, and grow your store (and connect with POD apps).
- Thanks to dedicated integrations, setting up a Shopify/Gelato connection is quick and simple. You even get access to pre-built shipping rules, and handy mockup generators.
Quick Tips:
- Choose products carefully: Start small with some Gelato’s best-sellers, like their fantastic art and print products, and scale over time.
- Consider Personalization: Take advantage of Gelato’s Personalization Studio to give customers the option to create their own products.
- Master Marketing: Remember, marketing is on you. Experiment with social media, email, SEO strategies – anything that speaks to your audience.
Why the Shopify + Gelato Combo Makes Sense
You don’t have to use Gelato and Shopify together. Gelato integrates with a bunch of different ecommerce platforms and marketplaces.
Shopify also connects with a massive range of other print on demand solutions. But personally, I think this combo is ideal, for a few reasons.
Before I landed on Shopify and Gelato, I tested the waters with a few other tools that promised the world and delivered a headache. Some had clunky interfaces.
Others had decent products but shipping that took forever and a half. Shopify and Gelato are just built differently, and they work together like they were made for each other.
Why Shopify?
If you’ve read any of my previous articles, you’ll already know Shopify is my go-to ecommerce platform. It just has everything a scaling business owner needs.
It’s clean, flexible, easy-to-use, and incredibly versatile. The feature set is always evolving, the integration list is endless, and even the pricing is reasonably fair (although not the cheapest out there).
I’m also a big fan of how easy Shopify makes it to sell across multiple channels, from marketplaces, to social platforms – even offline.
Why Gelato?
Out of all the POD platforms I’ve tried (Printful, Printify, Gooten, CustomCat, etc), Gelato is easily the best for a few key things. It’s amazing for global, sustainable delivery.
The company’s whole focus is on producing products close to where your customers are, so they arrive fast.
Their product range is impressive – particularly if you’re looking at art and paper products. The platform also offers unique tools, like its Personalization Studio, and pricing calculators. Plus, product quality and customer service are consistently solid.
How to Use Gelato with Shopify: Step by Step
Now let’s get into the meat of this guide. The good news is that actually connecting Gelato and Shopify is incredibly simple. Gelato is available right there in the Shopify app market, so there are no APIs to work around, and you don’t need to do any complex coding.
The first thing you’ll need to do is just create accounts for both platforms. I usually recommend the Basic plan for beginners on Shopify (but you can find our pricing guide here).
For Gelato, if you’re just getting started, it makes sense to use the free plan – though the paid subscription options are definitely worth considering as you scale.
Once you’ve got your accounts figured out, here’s how you can get everything set up.
Step 1: Connecting Shopify and Gelato
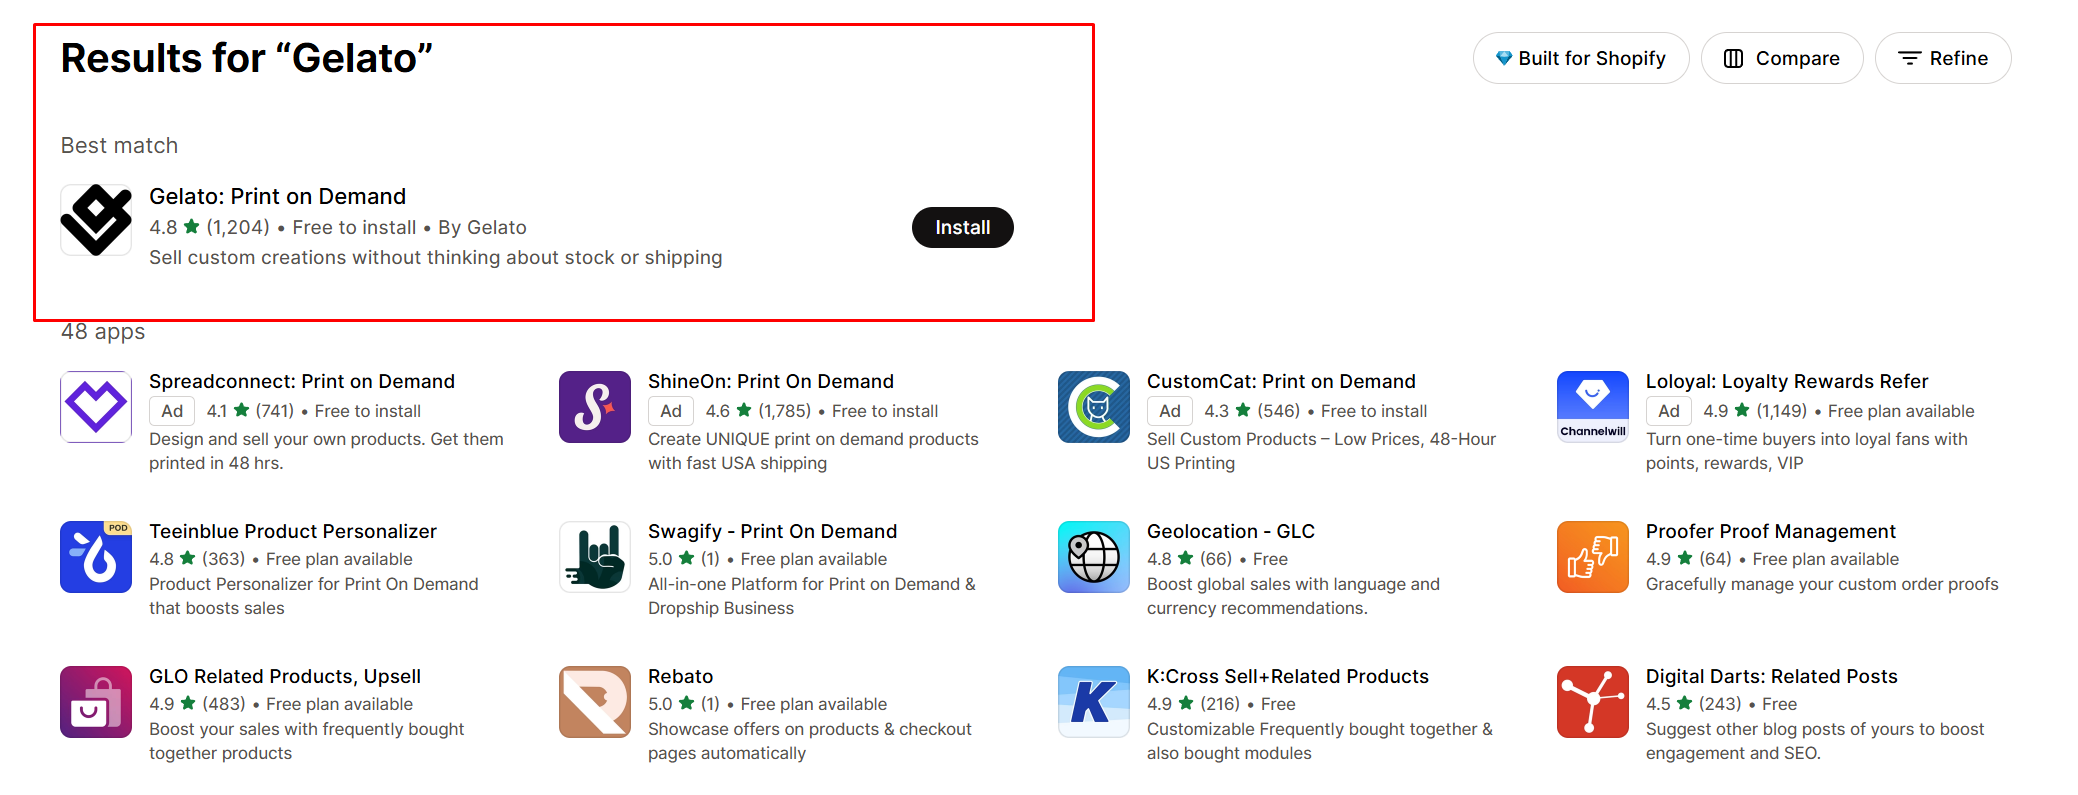
Log into your Shopify account, then visit the App Market. You can search directly for “Gelato” here, and you should see the app appear at the top of the page. Click on Install and follow the set-up wizard. You’ll need to log into your Gelato account during this set-up.
Plus, you’ll have to confirm that you trust Gelato to share data with Shopify (and vice versa). Gelato’s dashboard will also give you a few initial set-up steps you can follow or ignore (for now).
https://ecommerce-platforms.com/go/tryGelatoFor instance, you can choose your billing method, and decide whether you want to auto-fulfill orders.
I’d actually recommend the auto-fulfill option for most companies, as it saves a lot of time, but if you’d rather review things before you ship them, or you’re letting customers personalize products, you might want to pick the manual review method.
If you’ve been using another POD platform on Shopify, Gelato also gives you the option to sync your existing listings. This saved me hours. No need to recreate every single product from scratch.
Step 2: Pick Your Products (But Don’t Go Overboard)

This is where things get fun, but sometimes a little overwhelming. From your Shopify store, choose the Gelato app, and dive into the catalog to start exploring products. Gelato’s catalog is stacked: apparel, mugs, tote bags, framed prints, metal posters, calendars. It’s easy to fall down a rabbit hole. But if you’re just starting, less is more.
My advice?
Pick one or two product types you’re excited about and that make sense for your audience. I started with posters and T-shirts, they’re simple, versatile, and don’t require a ton of upfront testing.
Here’s how I added my first product:
- Open the Gelato app from inside your Shopify dashboard.
- Head to the “Stores” tab and click “Create product.”
- Choose your item, then upload your design or build one using Gelato’s built-in editor.
Within the editor, you’ll be able to select various branding elements (like custom layouts), add different components to your product, and play with colors. You’ll also be able to create mock-ups, which I definitely recommend doing for your Shopify product pages.
Once your product design is ready, you’ll need to add all the other information your customers need, like your title, description, tags, pricing, any collection information, and shipping details. You can tweak these things later, so don’t panic if you’re not sure straight away.
Step 3: Shipping Setup Made Simple
Shipping is usually the part where things start to unravel. Different rates for different regions, weird checkout errors, customers messaging you about delays.
But one of the big reasons I went with Gelato for Shopify is because they’ve already handled a lot of this behind the scenes. Their shipping system just plugs into Shopify and takes care of the heavy lifting.
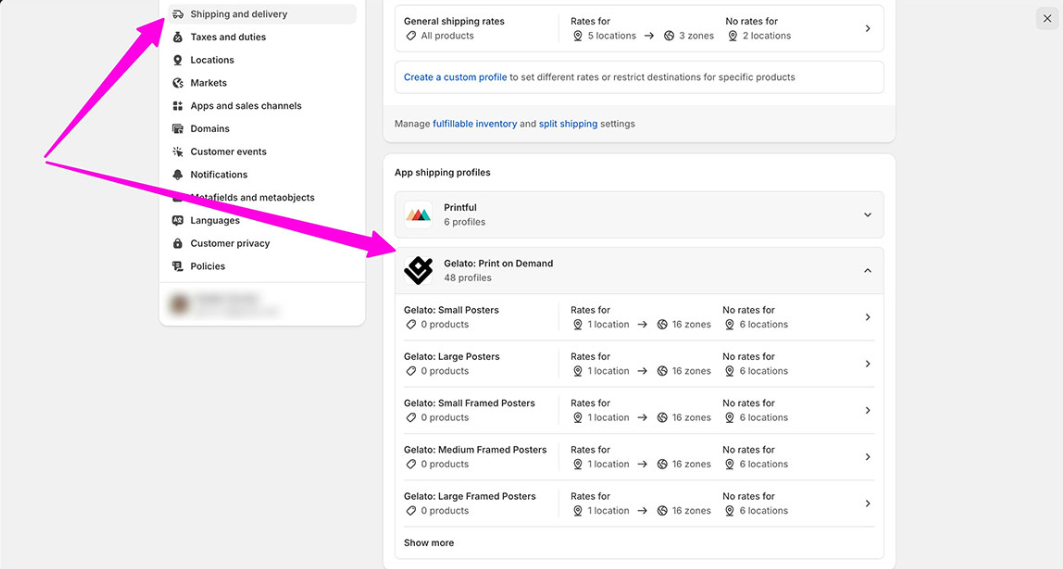
As soon as you connect Gelato to your Shopify store, it automatically adds pre-built shipping profiles. These are synced to the real shipping costs that Gelato charges, so you don’t have to manually calculate anything.
Just go to the Shipping and Delivery tab on your Shopify admin dashboard and click “Gelato” to see your profile options. Bonus, turn on “live shipping rates”, if you can.
This means when a customer checks out, Shopify pulls the exact shipping cost from Gelato in real time. Notably, you will need to have Shopify’s Advanced plan or higher (or use a workaround like adding a carrier-calculated shipping add-on).
If you’re on a lower-tier plan and can’t use live rates yet, just stick with flat rates that cover your average costs.
A couple of things I learned:
- Offer multiple shipping options. Some customers want the cheapest rate. Others are happy to pay more for speed. Gelato supports standard and express: let people choose.
- Highlight local delivery in your product descriptions. One of Gelato’s big wins is that they produce locally in 30+ countries. This often means faster delivery and fewer customs headaches, which people really appreciate.
If you want to go the extra mile, mention how local production reduces carbon emissions. It’s not just good for the planet, it actually matters to buyers, especially if you’re building a brand around values.
Step 4: Add Customization (This is Optional, but Worth It)
Gelato has a feature called the Personalization Studio, and it’s one of the best tools I’ve seen for making your products feel one-of-a-kind, without adding more work to your plate.
Basically, it lets your customers customize certain parts of a product: names, dates, quotes, photos. So instead of selling a mug, you’re selling their mug. That difference is huge when it comes to gift buyers. Here’s how I used it:
- Inside the Gelato app, when creating a product, you can enable personalization fields, like text boxes, image upload slots, dropdown menus.
- You set the parameters (like font style or character limit), and Gelato handles the rest. They’ll automatically generate the print file based on whatever the customer enters at checkout.
It does cost a little more, currently an extra $1 per personalized item. But in my experience, that gets covered easily when you price products accordingly.
People expect to pay more for something custom. If you’re worried about customers uploading bad images or typos, you can switch on manual order approval.
That way, nothing goes to print until you review it. Personally, I leave this off unless I’m selling something where layout really matters.
Quick win: Add a “custom gift” collection to your store and bundle your personalized items there. They’re perfect for birthdays, weddings, and holidays, and that kind of targeting makes ads way more effective.
Step 5: Tune the Store So It Converts
Once your store’s live and loaded with Gelato products, the next job is making sure people actually buy. Here’s how I got my first real traction without spending weeks obsessing over every little detail.
- Polish Your Product Pages: A little effort goes a long way. Use Gelato’s clean mockups or create your own in Canva to show off your products. Highlight features that matter, like quality and sustainability, and write engaging, clear descriptions.
- Add a Few Apps: You don’t need to load up on endless integrations, but upsell tools, email capture pop-up forms, and chat and FAQ widgets can be great for boosting conversion rates. Consider experimenting with different options.
- Go omnichannel: Promote your store everywhere. Don’t’ just create SEO optimized blogs, work with journalists on press releases, connect with influencers, get active on social media, and even create a few videos for YouTube.
- Use your Insights: Use Gelato and Shopify’s analytics tools to make sure you know which products sell best to which customers. Dive deeper into customer preferences, market trends, and opportunities whenever you can.
- Remember Customer Service: Gelato won’t handle customer support for you – just production and fulfillment. Make sure you know how you’re going to handle complaints, returns, and other issues in advance.
My best advice? Start small and keep growing. Get your first product live, and then start experimenting based on the data and insights you gather.
The great thing about print on demand is that you only pay for the products you actually sell, so there are no real risks involved in exploring new options.
Using Gelato and Shopify The Right Way
If you’re looking for a way into ecommerce that doesn’t require inventory, shipping headaches, or a steep learning curve, Shopify and Gelato are hands-down one of the smartest combos out there.
You get Shopify’s powerful storefront tools, clean, flexible, and easy to use, paired with Gelato’s global print network that handles production and delivery like it was made for your business. The integration is truly effortless, too.
I’ve used a lot of tools in ecommerce, and most of them require compromise. This one doesn’t. Shopify and Gelato together give you speed, quality, automation, and room to grow.
